ArduPilot Firmware User Guide
This chapter describes key points to note when running ArduPilot firmware on the 7-Nano v2. In addition to this chapter, you may also need to refer to the following documents:
- 7-Nano V2 Quick Wiring
- ArduPilot Copter Documentation
- ArduPilot Plane Documentation
- ArduPilot QuadPlane Documentation
- ArduPilot Official Documentation
Loading Firmware
The 7-Nano v2® flight controller supports ArduPilot firmware. This section mainly explains how to load ArduPilot firmware.
[!TIP] The 7‑Nano V2 is an upgraded iteration of the 7‑Nano. Both models use the same
CUAV‑7‑Nanofirmware. ArduPilot firmware 4.6.3 and later supports both the 7‑Nano V2 and the original 7‑Nano. For the original 7‑Nano, the minimum supported firmware version is 4.5.6.
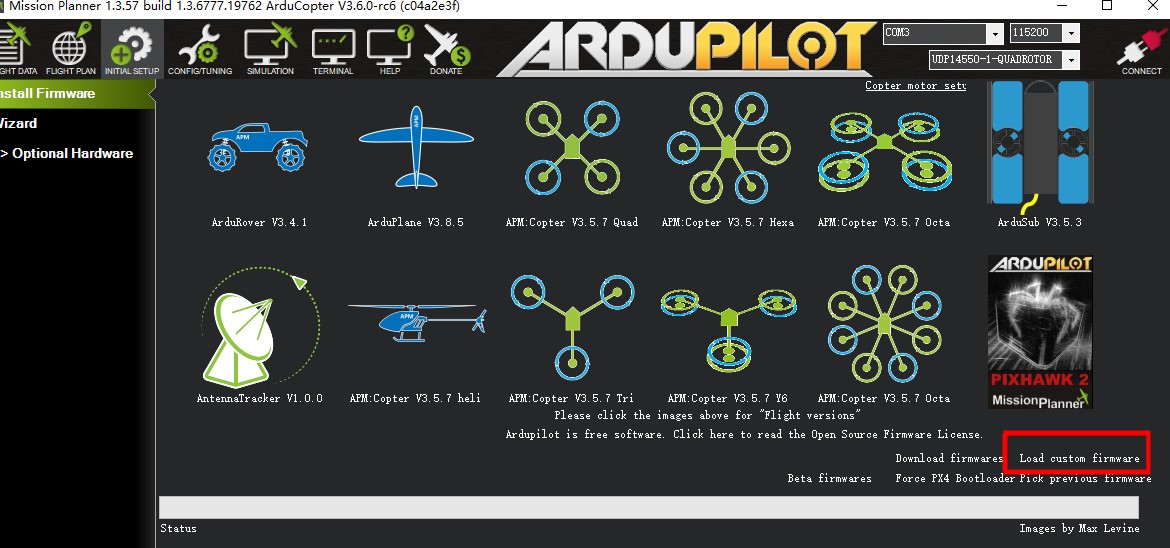
Online Firmware Flashing
Connect the 7-Nano to your computer, open the ground station software, go to Initial Setup > Install Firmware (CUAV-7-Nano), and wait for the flashing process to complete.
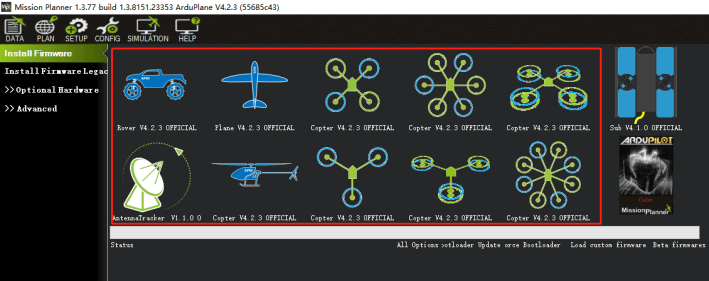
Offline Firmware Flashing
First, download the firmware files locally:
| Aircraft Type | Firmware Download Link | Application Description |
|---|---|---|
| Multicopter | arducopter.apj | Conventional multicopters such as quadcopters, hexacopters and octocopters. Supports hover, loiter, mission flight, return-to-home and other functions. |
| Conventional Helicopter | arducopter-heli.apj | Single main rotor helicopter with tail rotor. Optimized for variable-pitch propellers and dedicated helicopter control logic. |
| Fixed Wing & VTOL | arduplane.apj | Conventional fixed-wing aircraft, flying wings and VTOL vehicles. Designed for long-endurance and long-range mission flights. |
| Rover / Boat | ardurover.apj | Wheeled/tracked ground vehicles and surface watercraft. |
Select Load custom firmware, choose the downloaded firmware file, and wait for the flashing process to complete.
UART Mapping
| Serial Port | Hardware Interface | Function |
|---|---|---|
| SERIAL0 | USB | Onboard computer connection, firmware flashing |
| SERIAL1 | UART7 (TELEM1) | Data transmission / Radio link |
| SERIAL2 | UART5 (TELEM2) | Extended data link, peripheral communication |
| SERIAL3 | USART1(GPS&SAFETY) | Primary GPS & Safety switch |
| SERIAL4 | UART8 (GPS2) | Secondary GPS |
| SERIAL5 | USART3 (DEBUG) | Debug interface |
[!NOTE] TELEM1 and TELEM2 support flow control (RTS/CTS); other UARTs do not have RTS/CTS pins.
RC Input
The RCIN port supports all one-way RC protocols (SBUS/PPM/DSM).
DSM/PPM/SBUS Receivers Connect to the RCIN port using jumper wires; no additional parameter configuration is required.
For bi-directional receivers with telemetry such as CRSF/ELRS, connect to a UART port. The following is a configuration example using SERIAL2 (UART5/TELEM2) for bi-directional RC.
ELRS Receiver Connect the receiver to the TELEM2 port and set the following parameters:
Connect the receiver to TELEM2 port and set the parameters below:
- SERIAL2_PROTOCOL=23
- SERIAL2_OPTIONS=0
- RSSI_TYPE=3
- RC_OPTIONS=8192 (Use 420k baud for ELRS protocol)
Write parameters and reboot.
CRSF Receiver
- SERIAL2_PROTOCOL=23
- SERIAL2_OPTIONS=0
- RSSI_TYPE=3
FPort Receiver
- SERIAL2_PROTOCOL=23
- SERIAL2_OPTIONS=7
- RSSI_TYPE=3
[!TIP] Any UART can be used for RC receivers in ArduPilot, supporting all protocols except PPM. For more details, refer to Radio Control Systems.
PWM Output
7-Nano supports 14 PWM output channels.
| Group | Motor Channels | Timer |
|---|---|---|
| Group 1 | M1 ~ M4 | TIM5 |
| Group 2 | M5 ~ M6 | TIM4 |
| Group 3 | M7 ~ M8 | TIM1 |
| Group 4 | M9 ~ M11 | TIM8 |
| Group 5 | M12 | TIM15 |
| Group 6 | M13 ~ M14 | TIM12 |
[!NOTE] PWM outputs in the same group must use the same output rate and protocol. If any channel in a group uses DShot, all channels in that group must use DShot. M1-M8 support switching between 3.3V and 5V output, configurable via the
BRD_PWM_VOLT_SELparameter.
GPIO
All servo outputs can be used as GPIOs (for relays, camera shutter, RPM sensing, etc.). To use a pin as GPIO, set SERVOx_FUNCTION=-1 (where X is the pin number).
| No. | Interface | GPIO Pin Number |
|---|---|---|
| 1 | M1 | 50 |
| 2 | M2 | 51 |
| 3 | M3 | 52 |
| 4 | M4 | 53 |
| 5 | M5 | 54 |
| 6 | M6 | 55 |
| 7 | M7 | 56 |
| 8 | M8 | 57 |
| 9 | M9 | 58 |
| 10 | M10 | 59 |
| 11 | M11 | 60 |
| 12 | M12 | 61 |
| 13 | M13 | 62 |
| 14 | M14 | 63 |
Example: To configure M14 as a relay output, set Relay_pin = 63.
Analog Input
7-Nano V2 is equipped with 6 analog input channels.
| ADC Pin | Function Description |
|---|---|
| Pin9 | Battery voltage sensor |
| Pin8 | Battery current sensor |
| Pin5 | 5V VDD power monitoring |
| Pin13 | 3.3V voltage monitoring |
| Pin12 | 6.6V voltage monitoring |
| Pin10 | RSSI voltage monitoring |
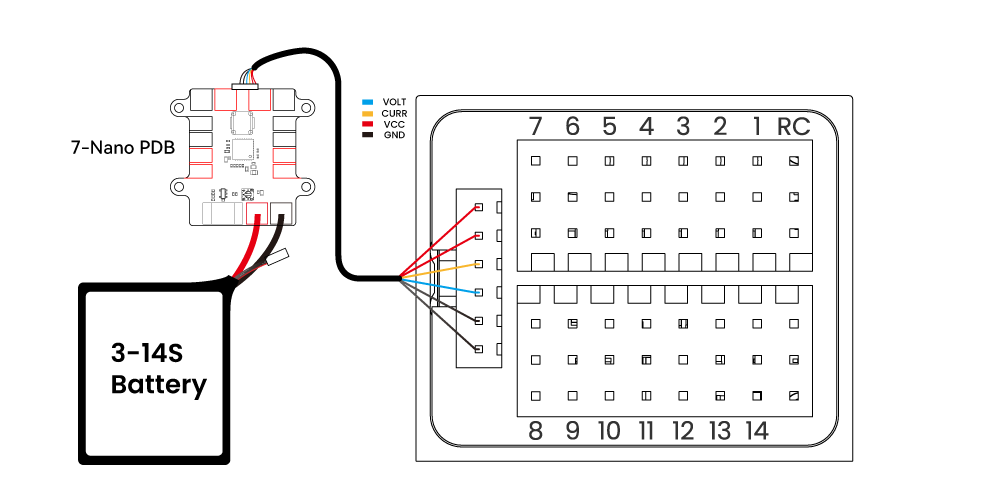
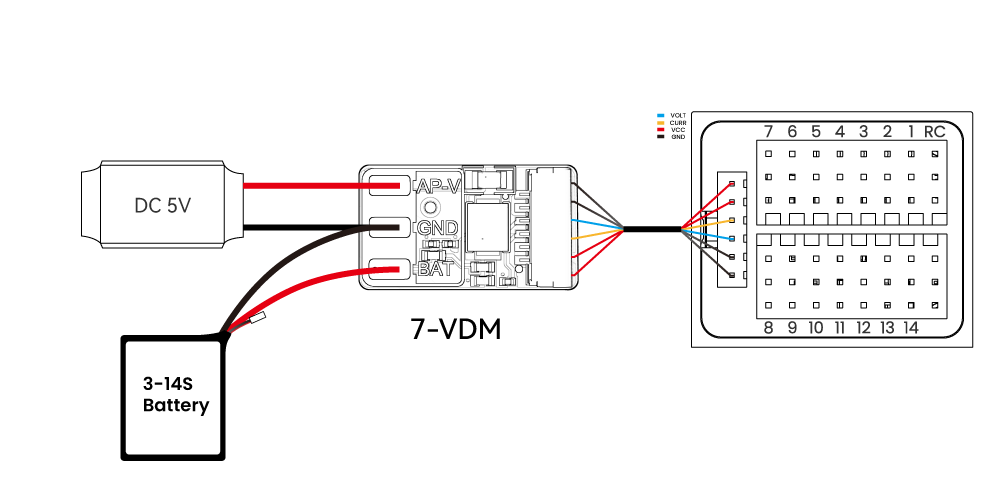
Battery Monitor (Current Sensor Setup)
[!NOTE] The standard package includes a 7-VDM power detection module, supporting 10–100V battery input, but only measures voltage (not current). A separate BEC module is required to power the controller. The PDB package includes a 7-Nano PDB power monitoring module, integrating BEC, power detection, and power distribution functions.
7-Nano PDB
For ArduPilot 4.6 and above:
- BATT1_MONITOR=4
- BATT1_VOLT_MULT=31
- BATT1_VOLT_PIN=9
- BATT1_CURR_PIN=8
- BATT1_AMP_PERVLT=24

For ArduPilot below 4.6:
- BATT_MONITOR=4
- BATT_VOLT_MULT=31
- BATT_VOLT_PIN=9
- BATT_CURR_PIN=8
- BATT_AMP_PERVLT=24
VDM
For ArduPilot 4.6 and above:
- BATT1_MONITOR=3/4
- BATT1_VOLT_MULT=31
- BATT1_VOLT_PIN=9

For ArduPilot below 4.6:
- BATT_MONITOR=3/4
- BATT_VOLT_MULT=31
- BATT_VOLT_PIN=9
Compass
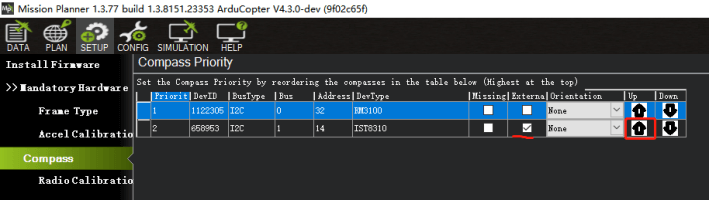
7-Nano has a built-in IST8310 compass. However, due to electromagnetic interference, the board is typically used with an external I2C compass integrated with a GPS module. The external compass (e.g., GPS?integrated compass) should always be set as the primary compass, with a higher priority than the internal one.
Ethernet Configuration
7-Nano supports LAN connection via Ethernet. Devices on the LAN must be on the same subnet with unique IP addresses to communicate with each other.
Open Mission Planner > Configuration > Full Parameter List, set NET_ENABLED=1, reboot the flight controller, then modify the following parameters:
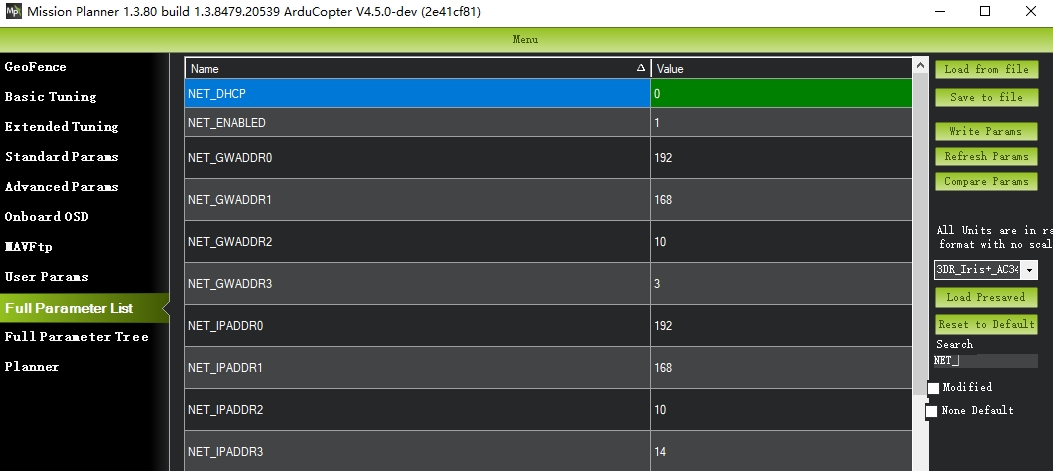
As shown above, set the controller IP to 192.168.10.14, and the router IP to 192.10.3 (adjust according to your actual router).
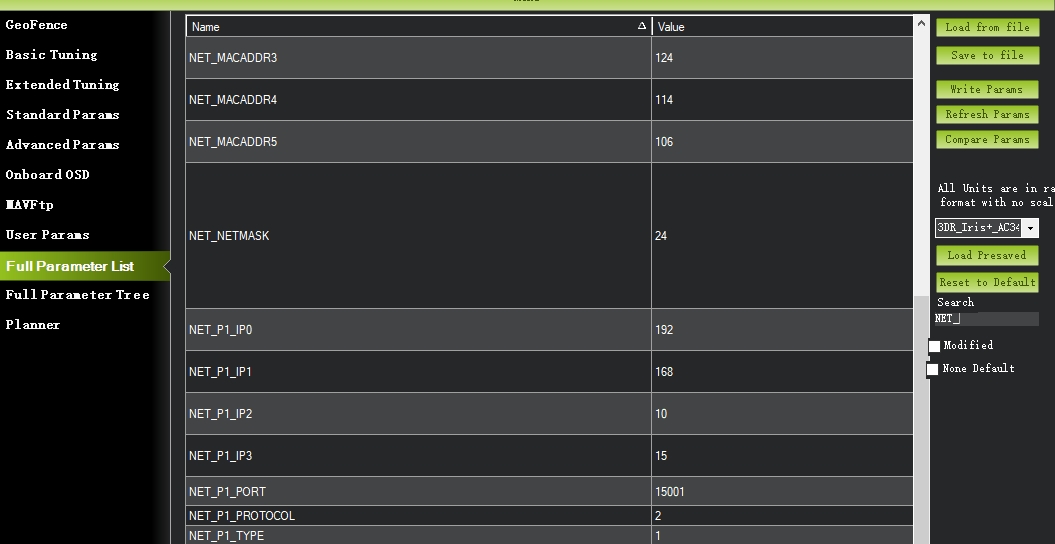 Set your computer IP to 192.168.10.15, and a network port to 15001 for UDP access with protocol type 2.
[!NOTE] Up to four ports can be configured.
Hardware Connection
- Connect the controller to your computer with an Ethernet cable, and power both the controller and the data link/router.
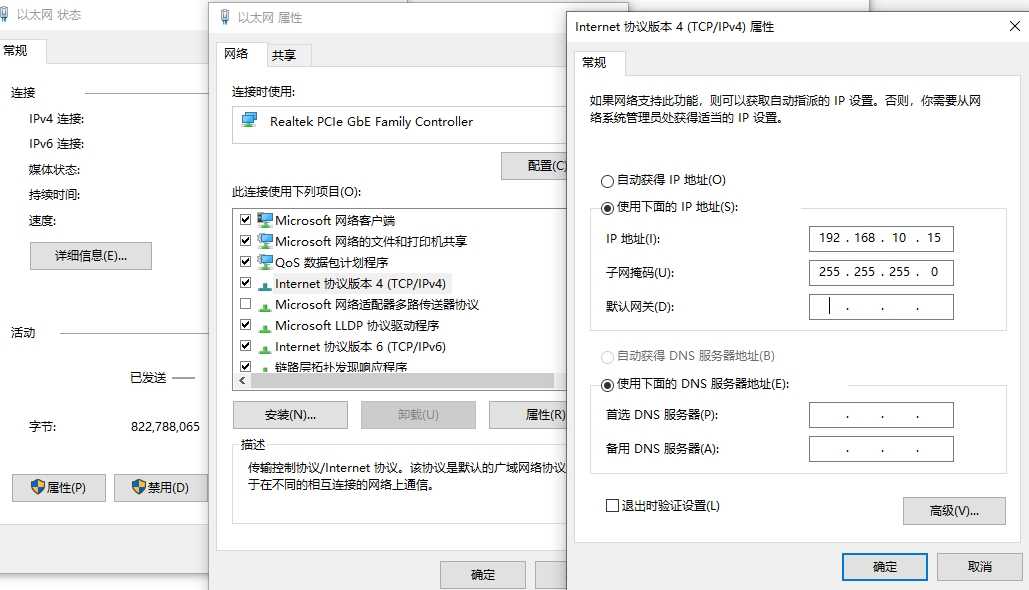
- Go to Windows Network Connections > Ethernet Properties > Internet Protocol Version 4 (TCP/IPv4), set a static IP (e.g., 192.168.0.1, subnet mask 255.255.255.0), then save.
Network Connectivity Test
- Open the Windows Command Prompt
- Run:
ping 192.168.10.4
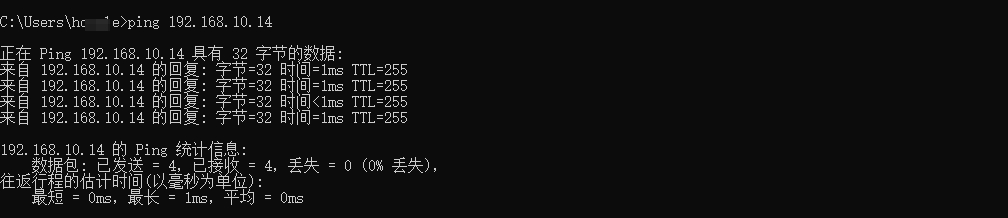
[!TIP] Successful ping replies indicate a valid connection. "Request timed out" means incorrect IP settings or connection failure.
Connecting via Ground Station
- Launch Mission Planner
- Set connection type to UDP
- Enter port number 15001
Developer Guide
- ArduPilot Source Code Repository
- Mission Planner Source Code Repository
- ArduPilot Developer Guide
- MAVLink Protocol
- DroneCAN Bus Protocol
[!COMMENT] CUAV does not provide technical support for secondary development of firmware or software. For related issues, please refer to the above guides or seek help from the ArduPilot community via the ArduPilot Discord channel.
ArduPilot Firmware Build Commands
./waf configure --board CUAV-7-Nano
./waf copter --upload
Pre-built firmware binaries can be found under the "CUAV-7-Nano" subdirectory at https://firmware.ardupilot.org.
The board comes pre?flashed with an ArduPilot?compatible bootloader, allowing any ArduPilot?compatible ground station to load *.apj firmware files.