C-RTK2 HP User manual(PX4)
This chapter applies to C-RTK 2HP with PX4 flight stack (flight controller running PX4 firmware).
[!NOTE] C-RTK 2HP supports connecting to the controller via CAN (DroneCAN) and UART. It is recommended to use CAN. Before configuration, you need to fix the two antennas and keep a distance of more than 30cm and maintain an open view of the sky. Do not get close to windows or other obstructions, otherwise you may not be able to obtain heading data.
DroneCan
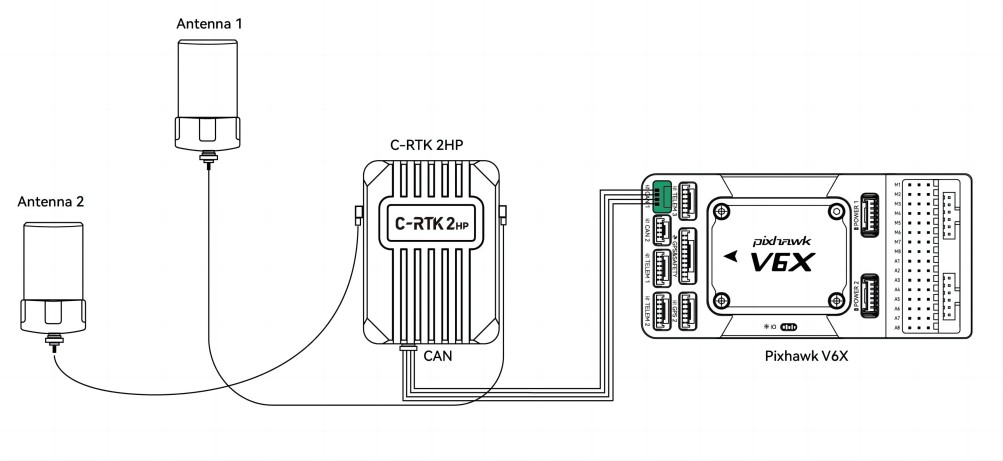
Enable C-RTK 2HP
UAVCAN_ENABLE="Sensors Automatic Config".EKF2_GPS_CTRL=15 (use dual antenna orientation as heading source). (If the primary antenna is in front, set the heading offset to 0. The angle increases clockwise, if the primary antenna is on the right side of the vehicle and the secondary antenna is on the left, set the offset to 90 degrees).EKF2_GPS_POS_X, Y/Z(Configure the distance between the main antenna and the center of gravity of the drone. If the antenna is fixed 25cm to the right of the center of gravity of the drone, configure EKF2_GPS_POS_Y to 0.25).UAVCAN_PUB_RTCM=Enable or UAVCAN_PUB_MDB (if using RTK, subscribe to PX4 flight control to forward RTCM data to the base station).
[!NOTE] Antenna 1 (ANT1) is the main antenna, and antenna 2 is the secondary antenna.
Configure C-RTK 2HP parameters
If the main antenna is not installed directly in front of the slave antenna, you need to configure the antenna installation direction for C-RTK 2HP.
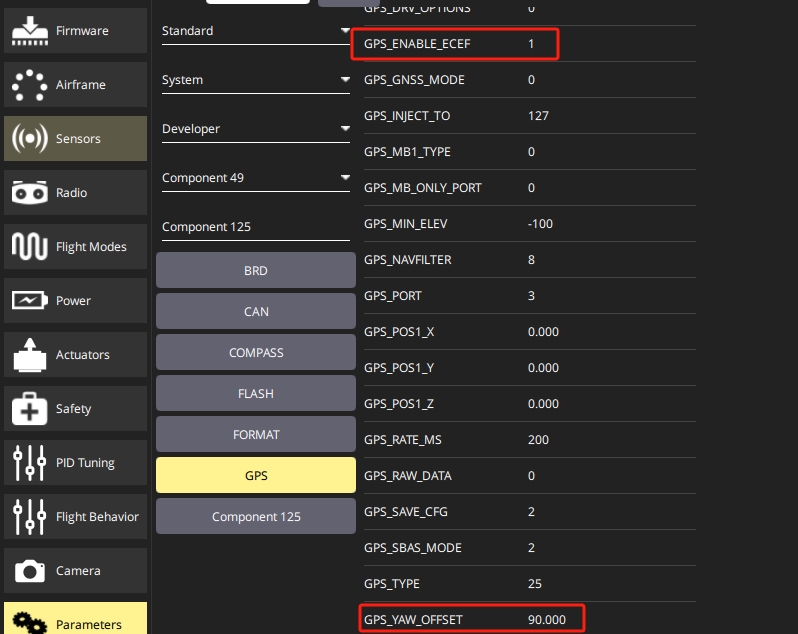
- QGC ground station》Parameters》Component X (X is the node ID)》GPS
- Set the
GPS_YAW_OFFSET(C-RTK2 HP parameter) according to the relative installation direction of the main antenna and the slave antenna. If the main antenna is in front, set the heading offset to 0. The angle increases in the clock direction. If the main antenna is on the right side of the vehicle, If the antenna is on the left, set the offset to 90 degrees). - set
GPS_ENABLE_ECEFto 1. EKF3_MAG_TYPE=5 (do not use magnetic compass, turn it off if you don't need it)[!TIP] Don't set the
GPS_YAW_OFFSETparameter of the flight controller incorrectly, as it is invalid for the heading data of C-RTK 2HP.
Confirm heading information
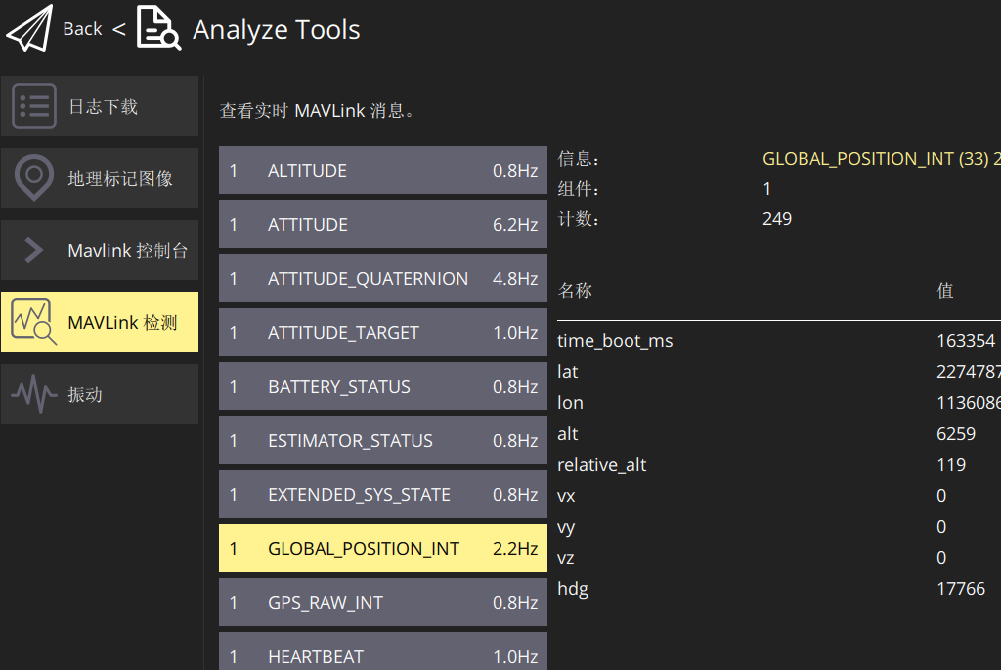
- After the setup is completed, place the vehicle outdoors in a good air environment and perform GPS star searching. When the GPS positioning is completed, you can observe whether the YAW value of GPS_RAW_INT is consistent with the aircraft heading in the QGC》mavlink detection interface. If they are consistent, the setting is correct. If they are inconsistent, please check the
GPS_YAW_OFFSETconfiguration of C-RTK2 HP.
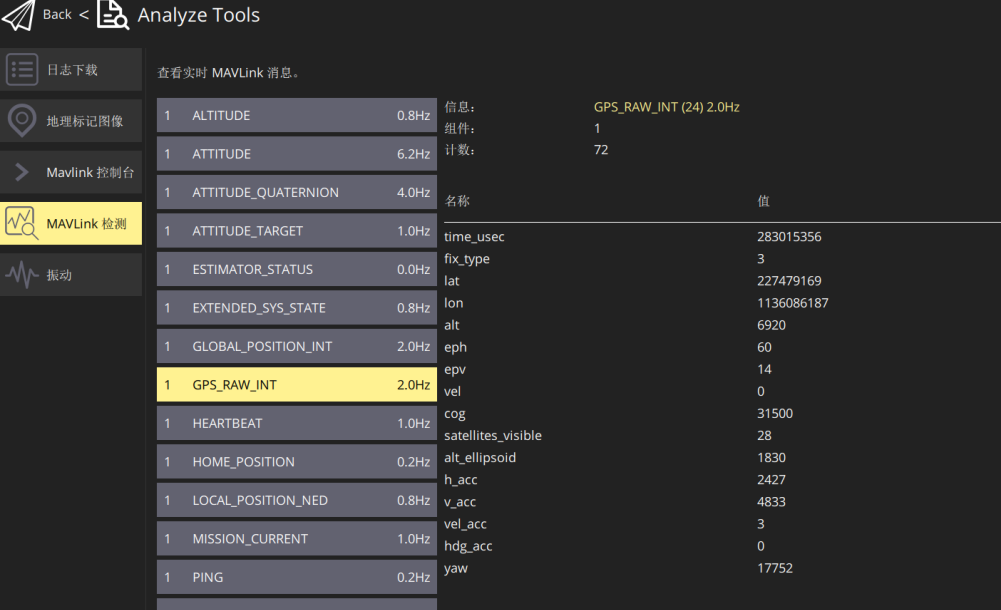
- The hdg value of GLOBAL_POSITION_INT is consistent with the yaw value of GPS_RAW_INT, indicating the aircraft heading using gps direction data.
[!TIP] If C-RTK 2HP still cannot obtain heading data after successful positioning and there is no
GPS_YAW_OFFSET/GPS_ENABLE_ECEFparameter in the QGC CANNODE parameter table, please upgrade the C-RTK 2HP firmware.
Firmware upgrade
PX4 can upgrade device firmware via DroneCAN. The flight controller and module communicate through CAN and are recognized normally. Copy the new firmware binary file (.BIN suffix) to the root directory of the SD card of the flight controller, and then restart. After startup, the flight controller will automatically transfer the firmware to the module and upgrade it. If the upgrade is successful, you can see that the firmware file in the SD card is automatically deleted, and a file named XX.bin is generated in the ufw directory.
The RTK system uses QGroundControl and the autopilot to forward the RTCM3 data from the RTK base station to the C-RTK 2HP and solve it.
The specific setting method is here.
[!NOTE] We recommend using C-RTK 9ps as an RTK base station instead of C-RTK 2HP because it requires a lot of setup work as an RTK base station.
Method 2: Make UART connect to the controller
UART
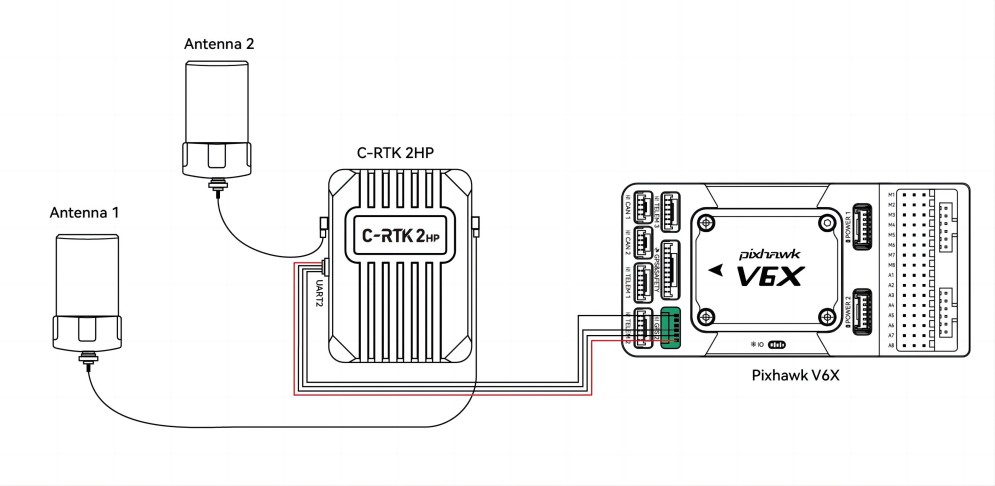
[!NOTE] PX4 cannot parse C-RTK 2HP heading data via Dronecan. It can be connected to the PX4 flight stack via the UART2 port to support heading.
C-RTK 2HP Config
The flight controller runs PX4 firmware and needs to install UPrecise software to configure the C-RTK2 HP receiver.
- Connect the C-RTK 2HP to the computer via USB.
- Enter the following command at the Uprecise command entry box
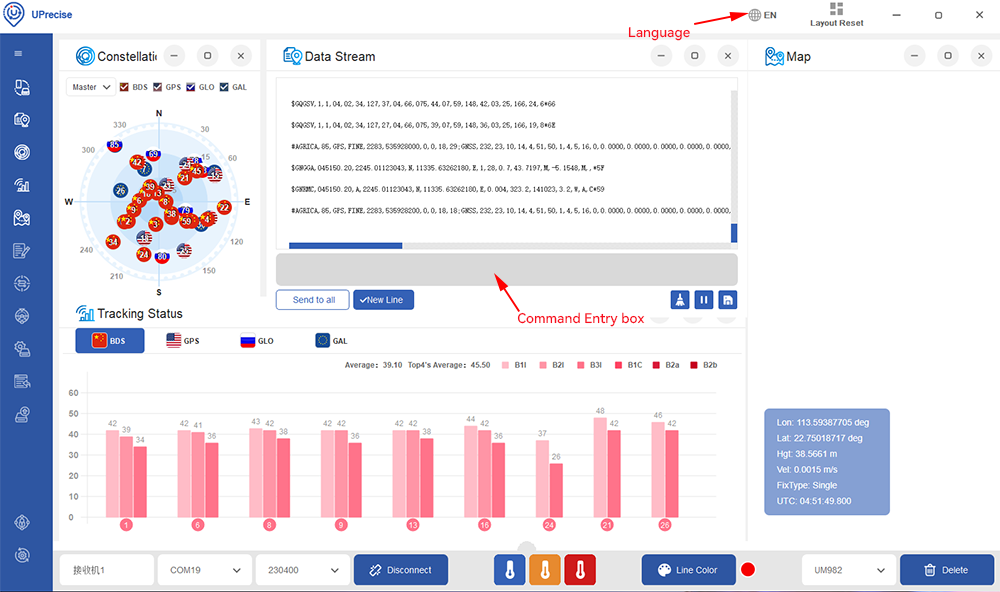
- press ENTER on keyboard:
CONFIG COM2 230400 8 n 1
GPGGA 0.2
CONFIG HEADING FIXLENGTH
CONFIG UNDULATION AUTO
CONFIG
UNIHEADINGA 0.200
AGRICA 0.200
MODE MOVINGBASE
GNGGA 0.200
GNRMC 0.200
VERSIONA
SAVECONFIG
PX4 parameter configuration
To use heading instead of compass in PX4, you need to modify the following parameters in the QGC Ground Station>Parameters page:
Ser_gps1_baud=230400
Gps_1_protocol=6:nmea
EKF2_GPS_CTRL=15 //Using dual antenna orientation as heading source)
GPS_YAW_OFFSET  //If the primary antenna is in front, set the heading offset to 0. The angle increases clockwise, if the primary antenna is on the right side of the vehicle and the secondary antenna is on the left, set the offset to 90 degrees)
EKF2_GPS_POS_X,Y/Z //Configure the distance between the main antenna and the drone's center of gravity. If the antenna is fixed 25cm to the right of the drone's center of gravity, configure EKF2_GPS_POS_Y to 0.25)
RTK Corrections
QGroundControl and autopilot forward RTK base station RTCMv3 to C-RTK 2HP for solving. The module should then change the positioning type to RTK positioning.
The specific RTK base setting method is here.
[!NOTE] We recommend using C-RTK 9ps, such a module as RTK base rather than C-RTK 2HP, as it requires a lot of setup.