
Wiring Quick Start
This quick start guide shows how to power the 7-Nano flight controller and connect its most important peripherals.
Wiring Chart Overview
The image below shows how to connect the most important sensors and peripherals (except the motor and servo outputs). We'll go through each of these in detail in the following sections.
The image below shows the most important peripheral connections of the 7-Nano.
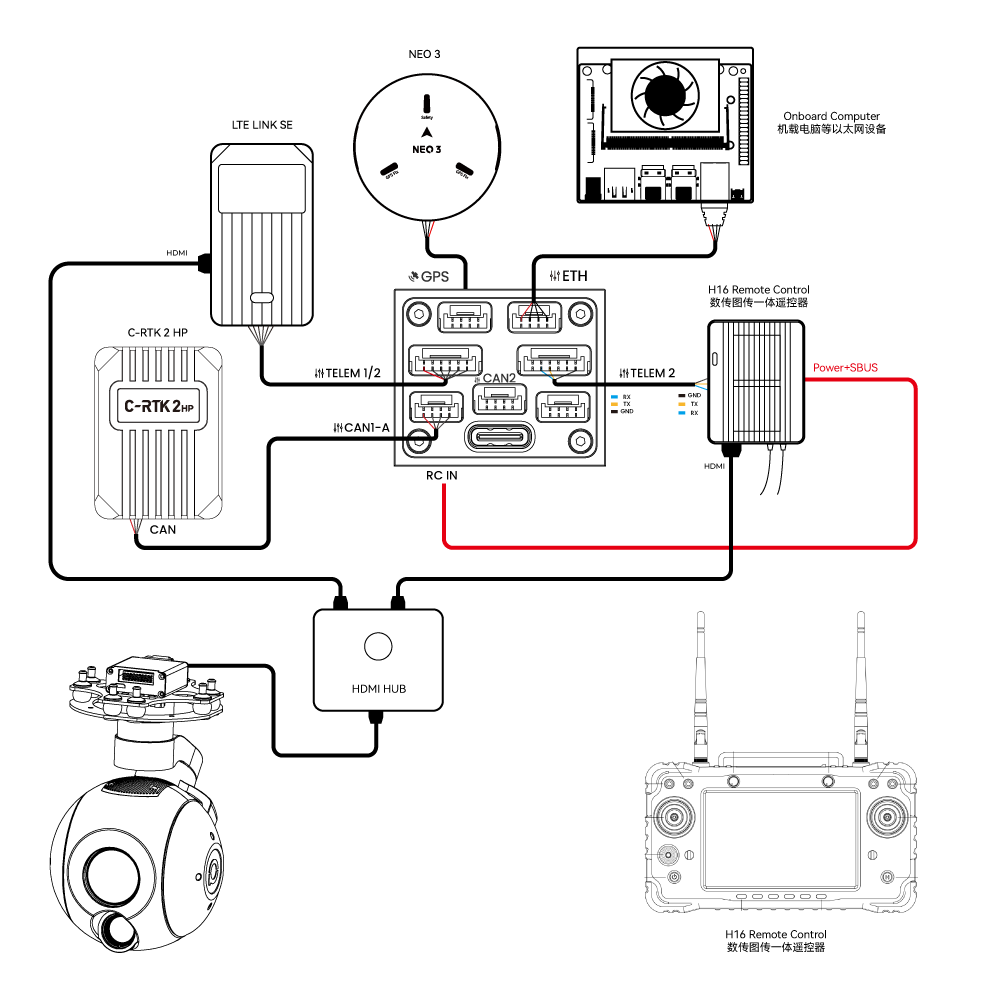
| Main interface | Function and purpose |
|---|---|
| POWER A | Connects to 7-Nano PDB; has power input & AD voltage and current detection function |
| M1~M14 | PWM signal output port, which can be used to control motors or servos; and M1~M8 can be configured as 5V PWM |
| RC IN | Connect remote control receivers with one-way protocols such as SBUS/DSM/PPMD (ELRS/CRSF receivers should be connected to any serial port, not RCIN) |
| RSSI | Used to connect signal strength backhaul module |
| GPS&SAFETY | Connect to Neo series GPS or C-RTK series RTK,(it includes GPS, safety switch, and buzzer interfaces) |
| GPS2 | Can be used to connect to GPS/RTK |
| DEBUG | Used for FMU chip debugging, reading DEBUG device information, and can be configured for other serial port purposes for Ardupilot |
| ADC | Contains ADC3.3 and ADC6.6, which can be used for analog level signal detection |
| TF CARD | Insert SD card to realize log storage function |
| ETH | Ethernet interface can be used to connect Ethernet devices such as accompanying computers |
| I2C | Connect to I2C devices such as external compasses for communication between flight control and I2C devices |
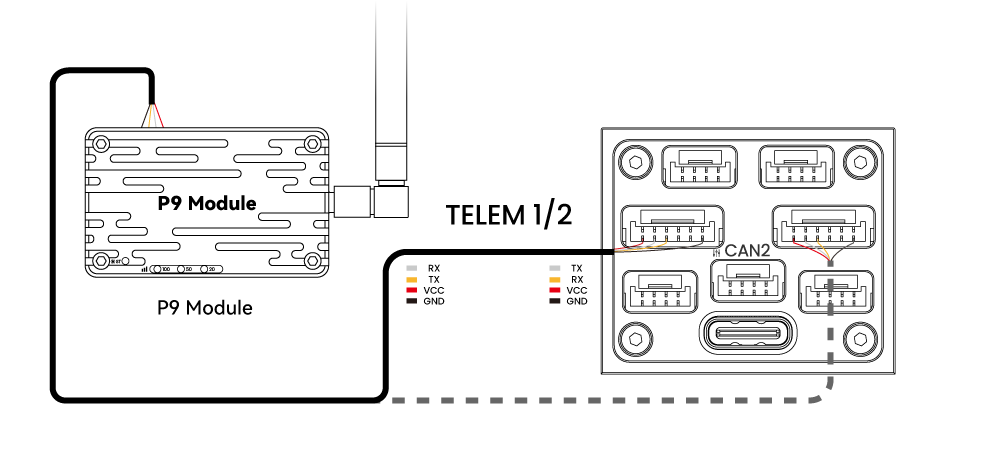
| TELEM1/TELEM2 | Connect data transmission, etc., used for MAVLINK interactive data |
| CAN1-A/B | CAN1 port, connected to UAVCAN equipment such as CAN GPS, used for communication between the flight control and UAVCAN equipment (such as connecting NEO3 pro uavcan GPS) |
| CAN2 | Connect to UAVCAN devices such as CAN GPS for communication between flight control and UAVCAN devices (such as connecting NEO3 pro uavcan GPS) |
| TYPE C | Flight controller USB interface, can connect to ground station, burn firmware and other operations |
Vehicle Front
NOTE
The default arrow points to the front of the aircraft. Make sure the arrow points to the front of the frame during installation. If the flight controller is not installed in the recommended/default orientation (e.g. space constraints), you need to configure the flight controller orientation (PX4 firmware click here, Ardupilot firmware click here).
GPS
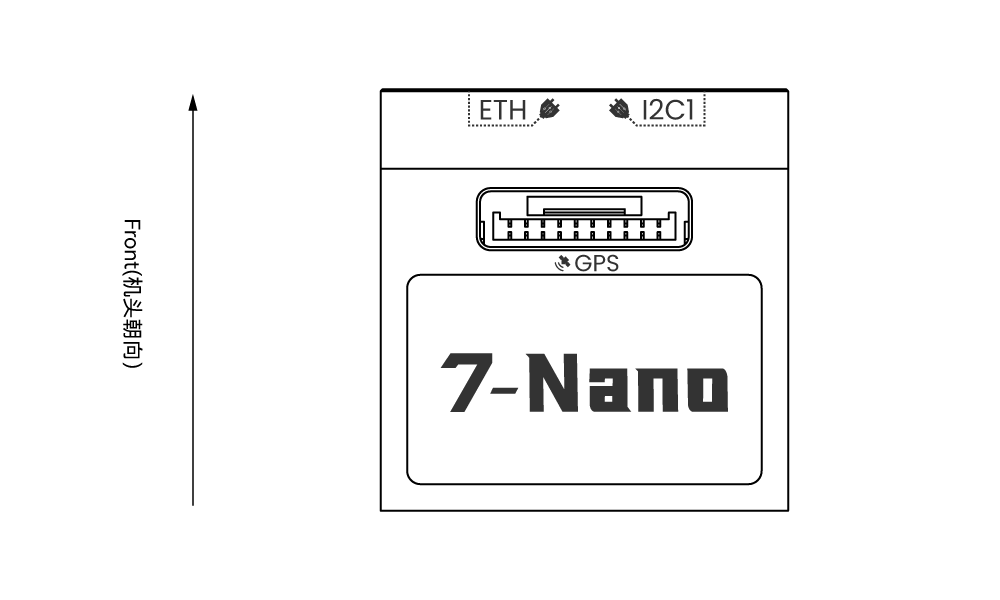
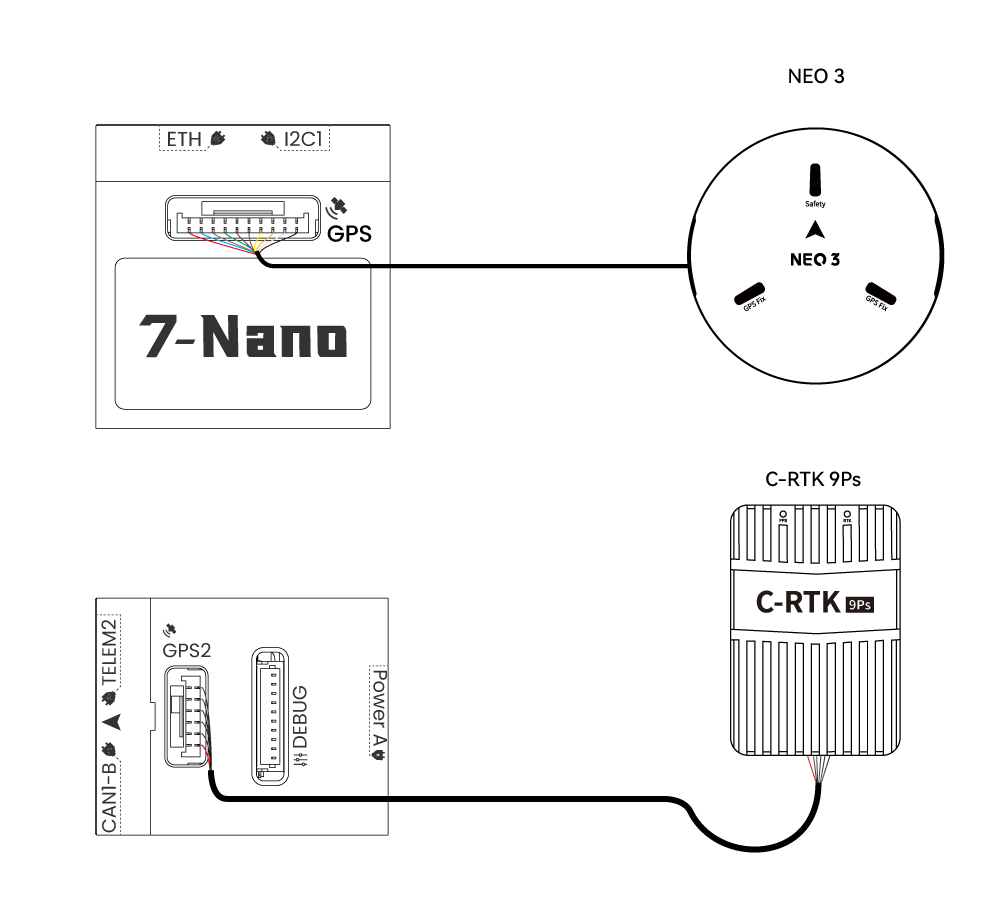
If you use Drone GPS; you should connect to CAN1/CAN interface; and modify flight controller parameters; for NEO 3GPS. If you are using it on an aircraft over 10kg, it is recommended that you use C-RTK 2HP or C-RTK 9Ps with heading message (using haeding instead of compass); to solve compass interference and avoid complicated calibration procedures, it is plug and play use.
Safety switch & buzzer
NOTE
When you use NEO series GPS, there is no need to install additional safety switches and buzzers.
If you are flying without GPS, you connect the switch directly to the GPS1 port to be able to unlock and fly the drone. (If you use the old 6-pin GPS, please check the interface definition at the bottom to change the wiring).
Remote control receiver
For your flight safety, it is recommended that you connect the handheld remote control whether flying manually or automatically (it can be used as an emergency rescue aircraft, unless you are not proficient in operating the handheld remote control). Different remote controls and receivers have different connection methods:
Android remote control Take H16 as an example:
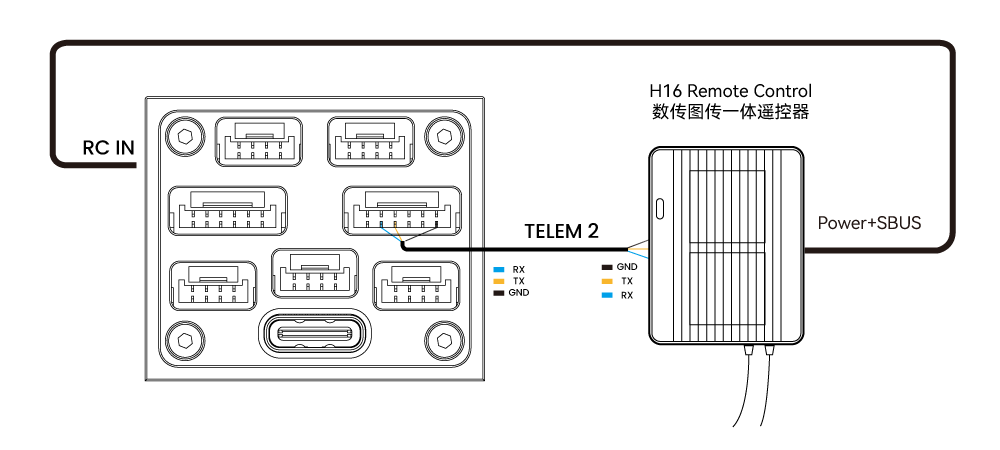
- Connect 7-Nano TELEM1/TELEM2 to the H16 remote control UART0 port and connect the H16 SBUS pin to the RC pin on the side of the 7-Nano.
unidirectional RC protocols(SUBS/DSM/PPM)
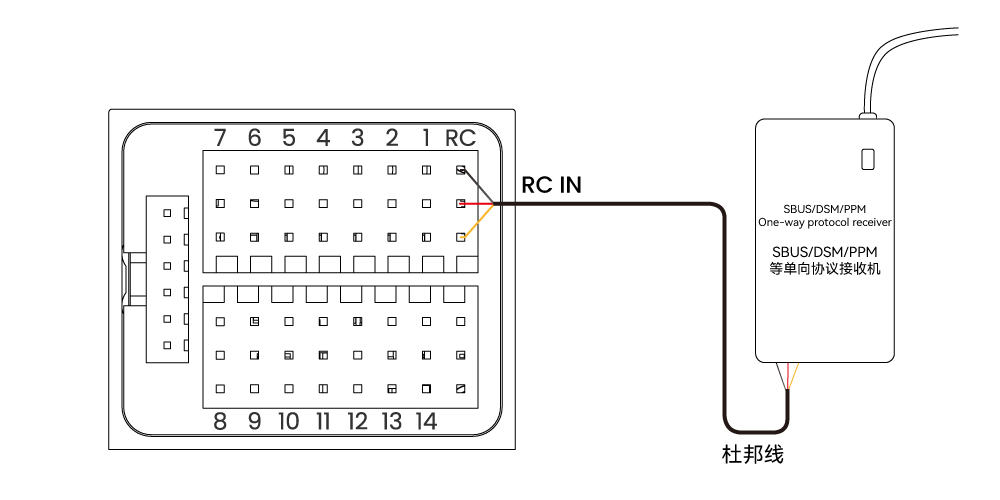
- Use Dupont cable to connect to the RCIN interface; no additional parameter settings are required.
ELRS/CRSF Receiver
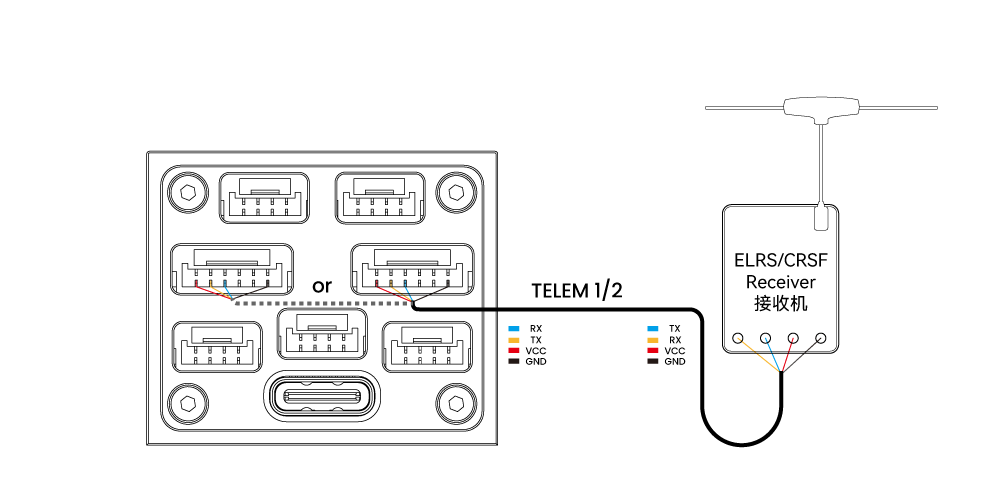
- Connect the ELRS/CRSF receiver to any UART serial port of 7-Nano (such as TELEM2); and modify ArduPilot (or [PX4 parameters](https:// docs.px4.io/main/en/telemetry/crsf_telemetry.html)
NOTE
Only one remote control receiver needs to be connected, multiple receivers are not supported.
Power
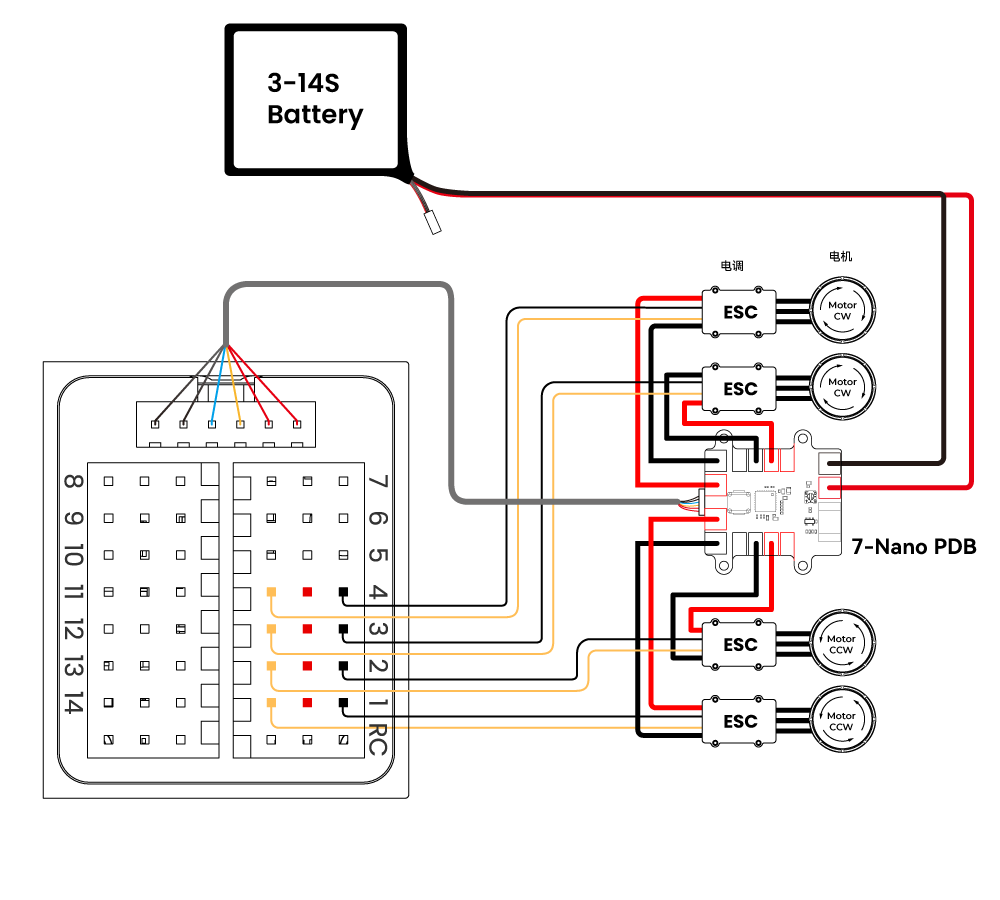
7-Nona is equipped with a 7-Nano PDB module, which supports 12~70V input. Please connect the 6pin connector of the module to the flight control Power A interface.
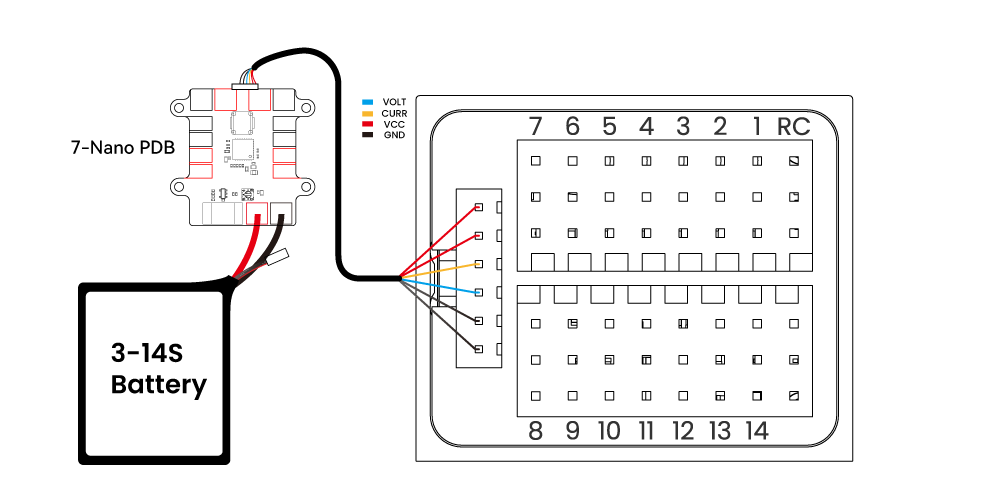
NOTE
ArduPilot firmware has configured parameters by default, and you do not need to configure the battery detector on the software.
Telemetry (data transmission) system
Using the telemetry system you can communicate with the drone through the ground station software. Monitor and control drones in flight. The airborne end of the telemetry system should be connected to the TELEM1/TELEM2 interface.
SD
The SD card is already installed when 7-Nona leaves the factory, you do not need to install it.
Motor
The motor/servo system is connected to the M1~M14 interface in the order specified for your carrier aircraft in the airframe reference.
Servo power supply
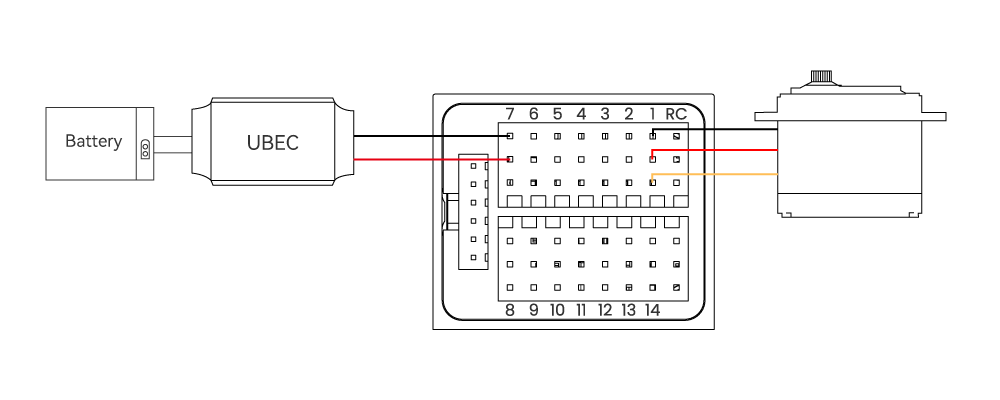
The 7-Nano servo interface is completely isolated from the internal power supply of the flight control. The flight control will not power the servo. If you need to power the servo, please connect the BEC to any positive and negative stage of M1~M14 (M1~ The positive and negative of M14 are connected); then connect the servo.